1.3 Slack
If we want to use Slack on a daily basis to keep communication channels open within teams and across our different offices. We have an
1.3.1 Slack Basics
Slack is organized into channels and direct messages. Channels are a way to organize conversations and other than a couple general
One great thing about Slack is that it’s searchable. You can search either by person or keywords to find old messages. Additionally, if someone sends you something you will need to reference multiple times, you can star messages and view them by clicking the star in the upper right-hand corner.
People have differing notification preferences, which you can set under Preferences → Notifications. If someone sends you a direct message or tags you, a number will show up on your slack app. If they add something to a channel you are on but don’t tag you, a red dot will show up. To ensure someone gets a numbered notification, either tag them (i.e. @Erin) or tag the channel (i.e. @channel). Tagging the channel will send a notification to every member of that channel.
1.3.2 Creating a Channel
When a new project starts, create a slack channel for it and add the relevant team members to it. To create a channel, simply click on the plus symbol next to channels and fill out the channel information (Name, Purpose, and Send invites to).
1.3.3 Helpful Terminology
Base: think of it like a database. A base is made up of tabs of spreadsheets that can be customized and linked to one another.
Workspace: multiple bases can be organized within a workspace. For example, we have an
1.3.4 Getting to Know the Workspace
Within the
Projects and Pipeline - Project Template
- Project-specific bases

The <UNK> Projects and Pipeline base contains overview information about current and potential projects. It is organized into the following tabs: Team Directory, Projects (current and archived), Deliverables (as outlined in the scope of work), and In the Pipeline (potential projects and their current stage).
The Project Template provides the basic structure for a new project-specific base. It should be copied when starting a project base from scratch.
Each Project Template base (see ‘required information’ below). If you are working on a smaller project that does not require its own base, add it to the Special Projects base.
1.3.5 Customizing your Project Base
It is up to you and your team to determine how to make Airtable work for you. Outlined below are different ways to customize your base. Feel free to look at other bases for inspiration!
1.3.5.1 Required Information
To maintain transparency within the team and keep track of who is working on what to foster collaboration, all projects should keep their Airtable base up to date.
The Project Template provides the basic structure for a project specific base. To copy, click on the arrow in the bottom right hand corner and select “duplicate base.” Then rename the base and customize it to the needs of your team.
The following tabs are required in your project base:
Deliverables: all deliverables stated in the scope of work
- Pro tip: add a number to the beginning of each deliverable so that when you group by deliverable in the activities tab, they show up in order instead of alphabetically
Activities: steps to achieve the deliverables. These are a level above individual tasks. For example if the deliverable is a report, an activity could be a literature review, and tasks would be specific components of the literature review.
Within the Activities tab, we employ a RACI chart to track responsibilities, which is broken into:
Responsible/Assigned to: who is responsible for doing the actual work for the task
Accountable: who is held accountable for the success of the task and is the decision maker
Consulted/Reviewer: who needs to be consulted for additional input or review
Informed: who needs to be kept in the loop on project progress
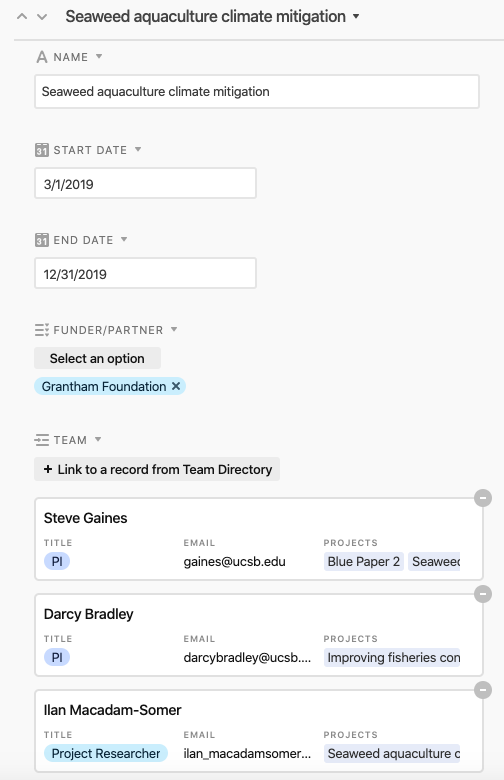
Team: list of team members with their project roles. This will be linked to the activities tab so you can see who is responsible and accountable for different activities.
1.3.5.2 Additional Tab Ideas
Tasks: more detailed steps of how to reach an activity; could be day-to-day tasks
- Note: you can link a tasks tab with the activities tab to see how they feed into one another
Datasets: way to keep track of all the datasets going into an analysis, if they have been collected, and what their priority is
- Example
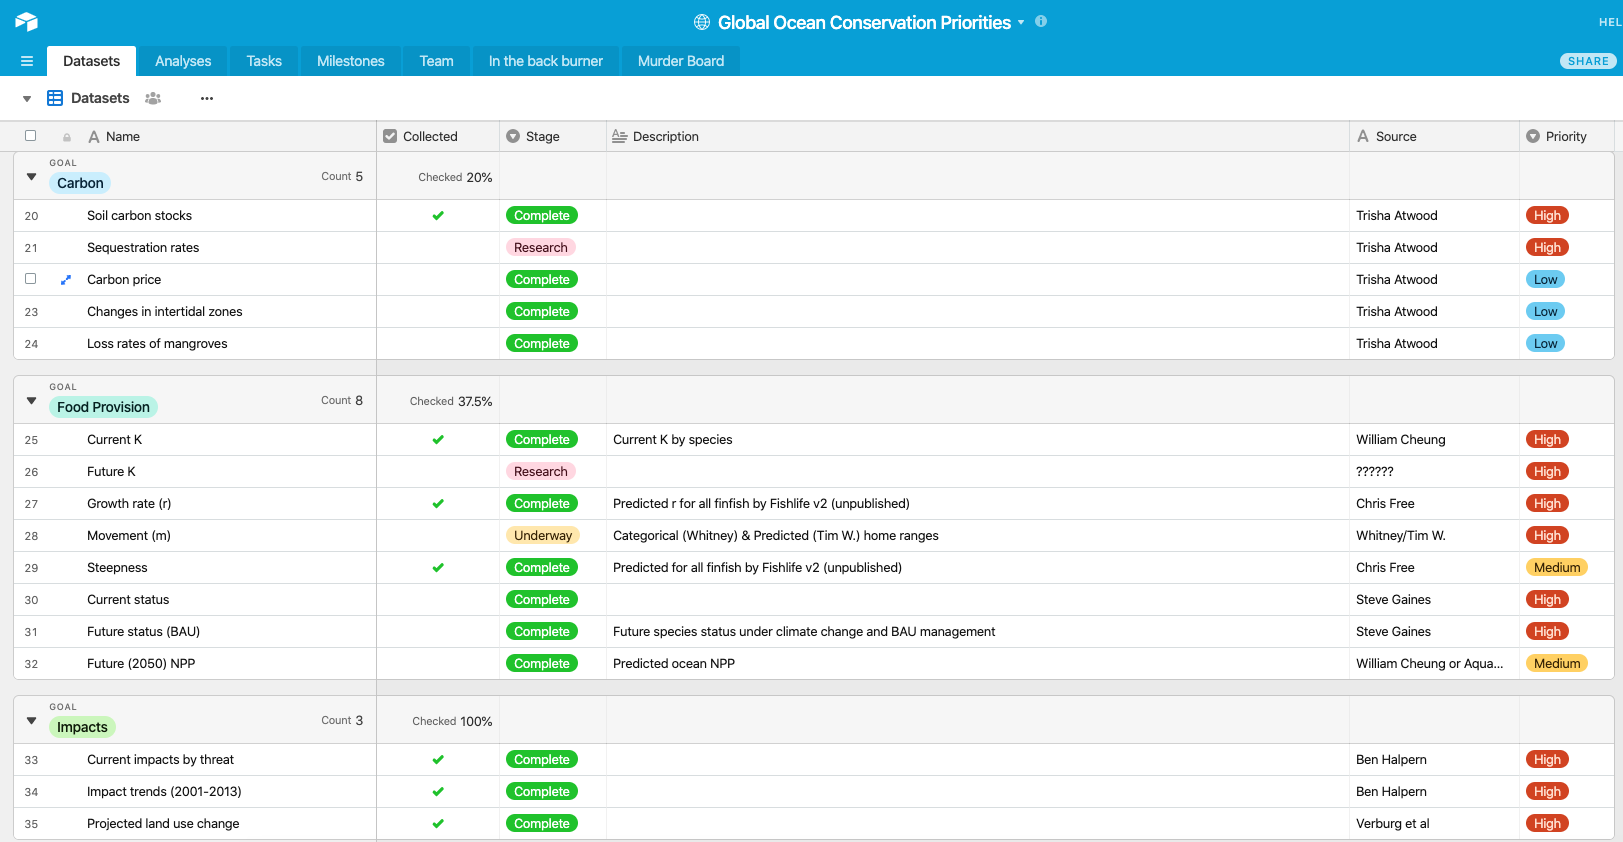
- Example
Analyses: tracking different versions of a model run to keep track of progress and outputs of different simulations run
- Example
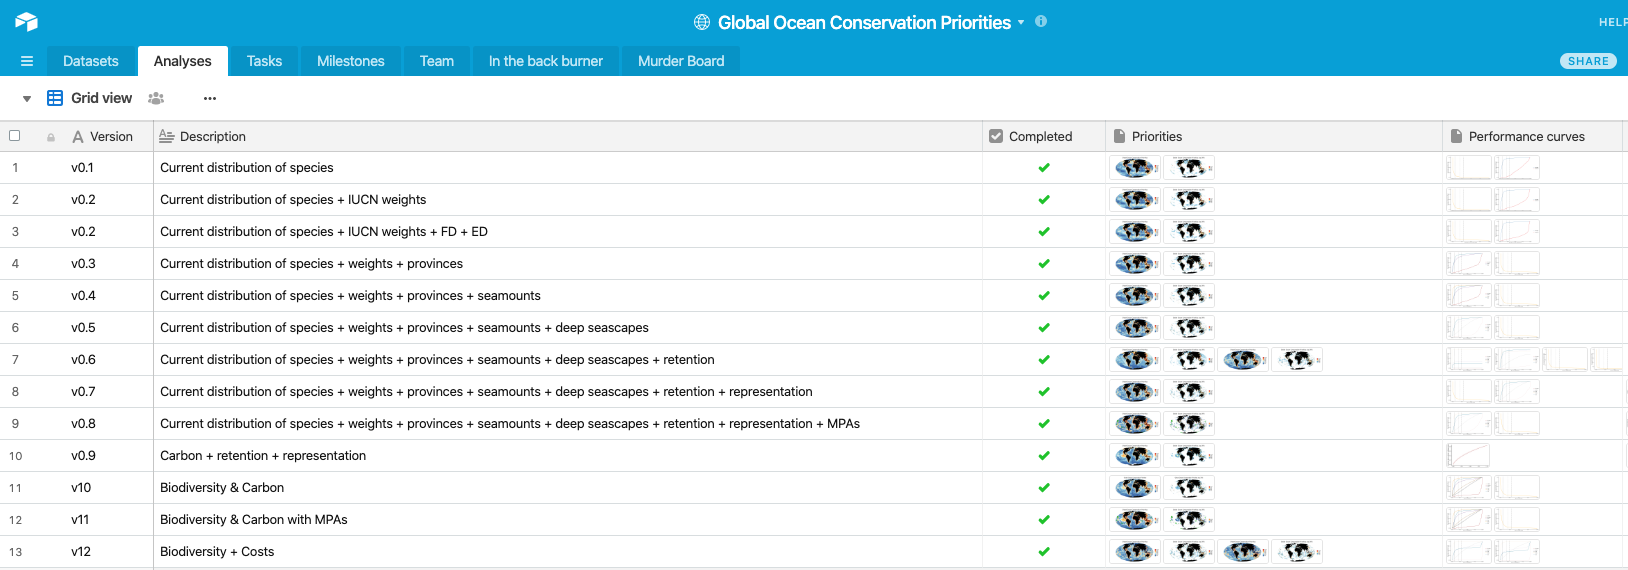
- Example
Murder board: tracking gaps in analysis
On the back burner: bonus analysis that can be added on if there is extra time
Stakeholders: tracking groups of stakeholders, what you want their feedback on, and when in the project you want their input
Conferences and events: helps track potential conferences or events to present your work at
Papers: if a project is planning to write multiple papers, dedicate a specific tab to tracking the papers and their progress
Questions for PIs/team: place to keep track of unanswered questions
1.3.5.3 Column Options
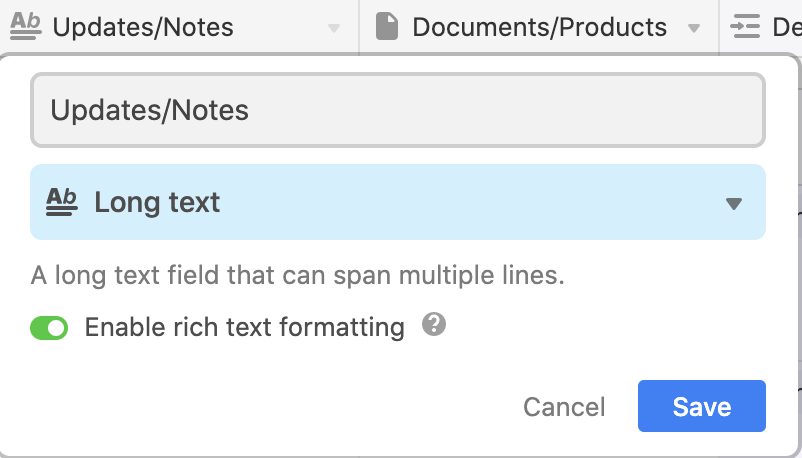
There are 25 column type options within Airtable. The ones we most commonly use are: link to another record (links information from different tabs within the same base; you can’t link information across bases), single line text, long text, attachment, checkbox, multiple select, single select, and date.
Pro tip: enable rich text formatting for the long text option to add checklists, bold and italic text, bullets, etc. Once enabled, double-click on the box you want to edit and select the ¶ symbol to see all of the formatting options.
1.3.5.4 Ways to View your Base
Different views
There are 5 different ways to view your base: grid, calendar, gallery, kanaban, and form, which can be explored here.
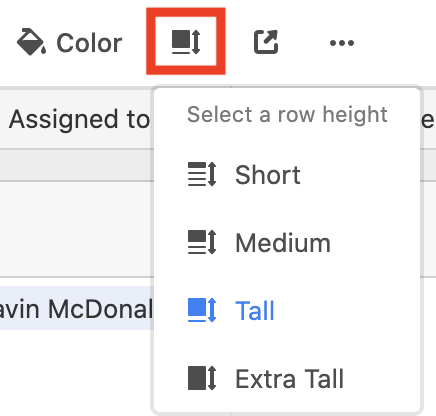
Pro tip: click on “Row Height” in the menu row to change the height of rows and therefore wrap text.
Filtering
This works like the normal filtering function in spreadsheets. You can sort A to Z, by date, exclude records with certain names, etc.
Grouping
Grouping allows you to bucket your spreadsheet by field type. You can group by deliverable, complete v. not complete, research track, etc.
Example: 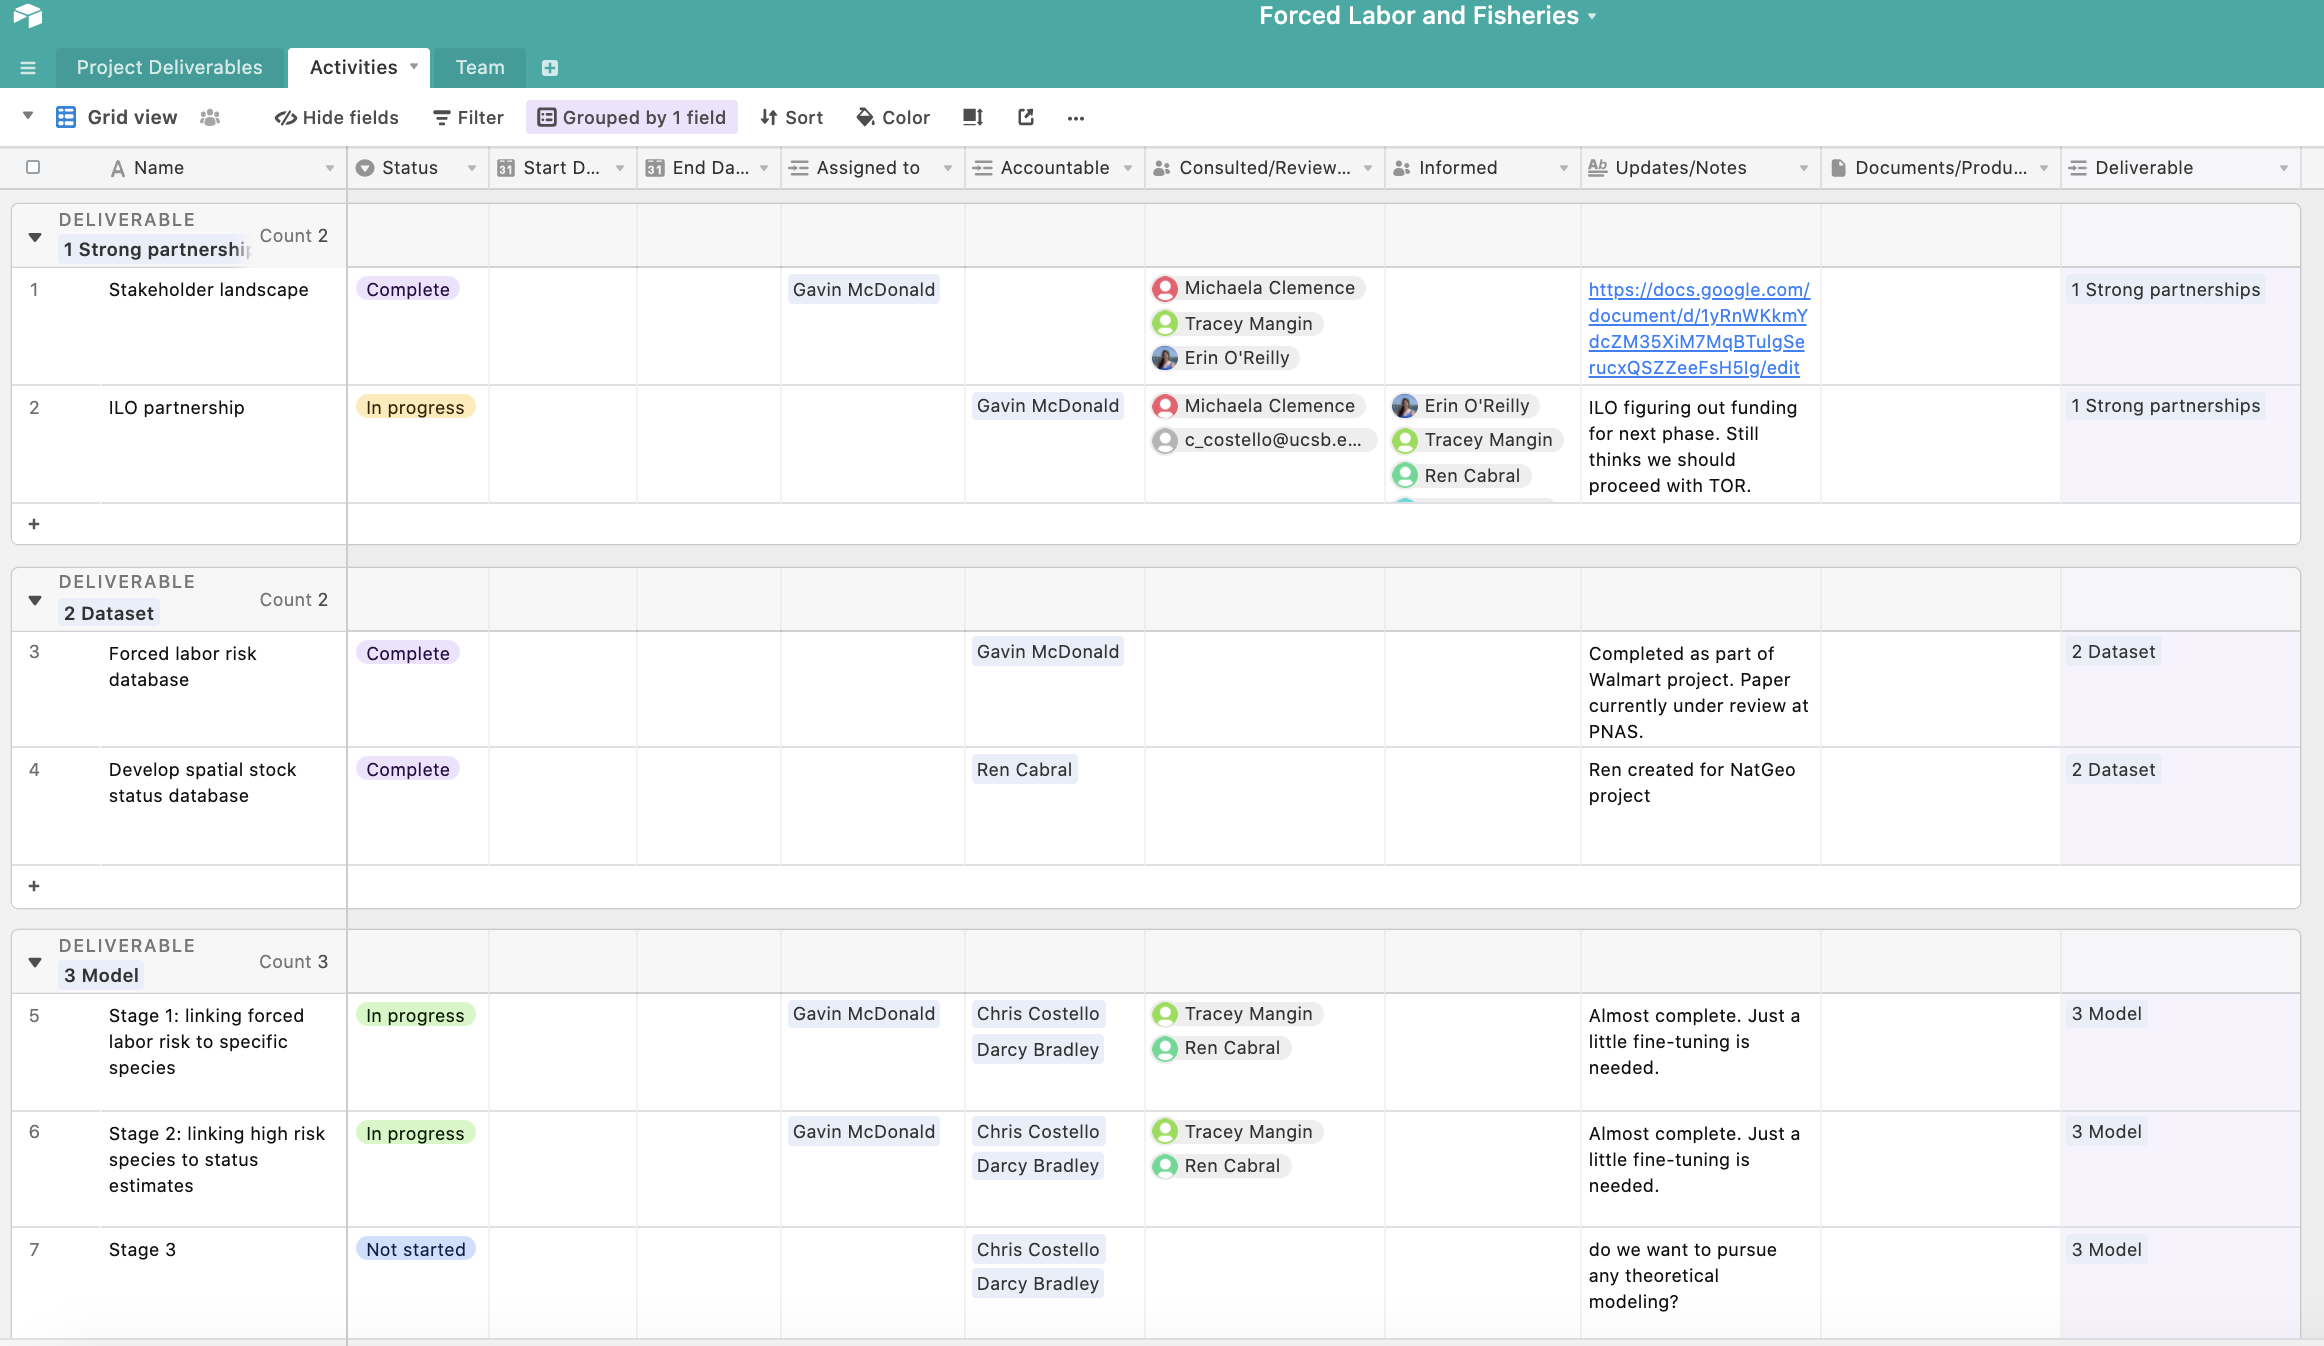
Expanding a record
Within each tab, you can expand records in the first column to view all its information at once by clicking the two opposing arrows before the text. This option combines information from all of the columns into an easy to read card format.